Loading... Please wait...
Owners Manual Users Guide
Congratulations on your decision to become involved with the exciting world of balloon stuffing and with the Keepsake Stuffer balloon stuffing machine - and thank you. This Owner's Manual will describe the basic operation of the machine and its accessories. It is intended to get you started quickly and, we hope, effortlessly.
Look this manual over completely before you begin. You should practice using the machine and experiment with various stuffing ideas before you begin to market your balloon stuffing services.
We are confident the machine will serve you and your customers well. Our Keepsake Stuffer video, periodic mailings and 1-208-529-9620 hot line are all available to help you on your way to becoming a pro and to provide any support you may need in your ongoing stuffing business. We are always eager to assist you and look forward to learning about your successes, new stuffing ideas, and new business applications. We would appreciate the opportunity to be of help and to learn from you as well. Call us for knowledgeable balloon stuffing help and one stop shopping convenience.
Please take a moment to fill out and return the Owner's Registration Card located on the last page of this manual. This will ensure that we will be able to contact you with updated information and that we can handle any warranty issues quickly.
Best of luck and again thank you for your confidence in the Keepsake Stuffer.
3 Easy Steps...
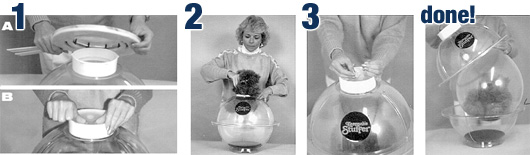
Entire process takes approximately three minutes.
Unpacking
When you receive your Keepsake Stuffer, unpack it carefully and make sure that all parts and items are present and undamaged. The accessories and supplies shipped to you will vary depending on what you have ordered. Listed below are the standard contents that are shipped in the normal, minimum package(s). If you have any questions, contact us immediately.
To insure that we can keep track of the owner of this Keepsake Stuffer, please take a minute to fill out and return the Owner's Registration. This will enable us to handle any future claims quickly and efficiently.
Component Parts
KS 1OOO
- Chamber Top
- Chamber Bottom
- Inflator Motor w/foot pedal
- Inflator Hose
- Cloth Stuffing Sleeve
- Rose Stuffer Tube
- Owner's Manual
KS 1003
- Inflator Motor w/foot pedal
- Rose Stuffer Tube
- Inflator Hose
- Owner's Manual
The Keepsake Stuffer comes to you fully assembled. Find a convenient work place and an electrical outlet and you are ready to begin.
Vacuum Chamber and Inflator Motor
Step 1
Select a convenient, comfortable place to work. You need suitable floor space and a desk or table on which to operate the equipment. The work surface should be a convenient height and be hard, level and stable. As you will see later, you will need to set the inflator motor on the floor when using the stuffing tubes. This floor area should also be a hard, stable surface. In both cases, the inflator motor's bottom port should not be obstructed by carpet or other materials. To ensure that an air space remains below the port, set the motor's three rubber feet on a hard surface.
Step 2
Wear eye protection when working with the Keepsake Stuffer to avoid injury. With the Keepsake Stuffer you will be working with latex balloons that may pop at any time with the least cause or warning. Especially since you are just getting started, please note this safety precaution.
Step 3
Place the chamber top on the chamber bottom, and set them on a flat desk or table surface. This avoids the possibility of damaging the lip of the chamber top while you are putting on a balloon.
 Step 4
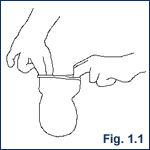
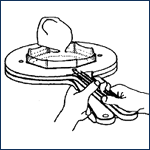
Take an 18", wide mouth stuffing balloon. Insert two fingers of each hand in the mouth of the balloon and stretch it open a few times. This warms and loosens the balloon.
(See Figure 1.1)
Roll the balloon neck down two times to shorten the neck.
Step 5
If you do not use the stretcher you can mount the balloon as follows:
Put the balloon into the opening in the chamber top and stretch the mouth of the balloon over the collar opening, fastening the balloon over the six tabs. There are two ways to do this (if you have long fingernails the first method is more practical).
With your thumbs, put one edge of the balloon mouth over the two tabs closest to you. With your thumbs inside the lip of the balloon and your fingers on the collar itself, stretch the balloon away from you and fasten it onto the two tabs on the far side. (See Figure 1.2) Fasten one side tab - turning the chamber top if you want to. Then fasten the last tab - turning the chamber top if you want to.
Option 2
Put the balloon on the two tabs farthest away. Pull the balloon toward you and fasten it over the two tabs closest to you. Fasten one side tab - turning the chamber top if you want to. Then fasten the last tab - turning the chamber top if you want to.
 With a little practice, this will become very easy for you. As you become comfortable with the machine, you will see that centering the balloon opening in the chamber top collar - by stretching the balloon evenly - will make subsequent steps easier.
NOTE: Necks of different balloons will vary in length. A shorter neck works better than a long one. If a long neck leaves too much material in the opening (after it is inflated), roll down the neck a couple of turns before stretching it over the collar.
Step 6
Set the inflator motor on the flat desk or table surface. The motor should have screened port facing up which is the suction side of the inflator. The end which blows is used to operate the rose stuffer, which is explained later in this manual. Plug the cord into an electrical outlet. Set the foot pedal in a convenient place on the floor.
Step 7
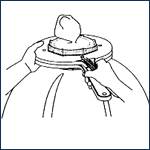
Holding the two halves of the chamber together, place the chambers on top of the inflator motor. (See Figure 1.3) (suction side up)
Step 8
Step on the foot pedal to inflate the balloon. Gently hold down the chamber collar with your hands. You can reach inside the balloon as it is inflating to guide the balloon to the center of the chamber. Run the motor until the balloon completely fills the chamber. When the balloon presses against the sides of the chamber, the motor sound will change, signaling you to release the food pedal. You cannot over-inflate a balloon in the Keepsake Stuffer chamber. The balloon opening should be centered in the collar with a minimum of balloon material crowding the opening. If it is not as neat and tidy as you require, remove the balloon and start over.
Step 9
Lift and remove the entire chamber from the inflator and set it directly on the work surface.
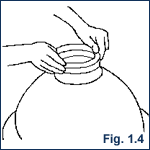
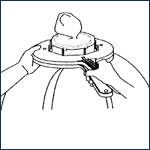
Step 10
Attach and stretch the cloth stuffing sleeve around the outside of the collar and into the opening. (See Figure 1.4) You are ready to stuff!
 |
 |
 |
1. Take any 18" balloon, roll back the mouth of the balloon a few rolls, place the balloon over the eight raised prongs. These prongs are together when the handles are spread apart. |
 |
2. Simply squeeze the handles together and the prongs will stretching the balloon to fit over the machine collar. |
 |
3. Make sure the prongs are upward and the opening of the stretcher is directly over the collar of the machine. Also make sure the tabs on the machine collar are not directly under the stretcher fingers or the balloon will not mount properly. |
 |
4. When the opening of the stretcher is centered over the collar lower the stretcher until the mouth of the balloon Is lower than the bottom of the collar ring. |
 |
5. Releasing the pressure on the handles of the stretcher will allow the balloon to fit closely to the collar. Make sure the mouth of the balloon is below the bottom of the tabs on the collar. With a downward motion push the stretcher until the balloon releases from the prongs of the stretcher. This unique balloon stretcher is designed to stretch balloon from 6" through 18". It is especially useful in mounting the smaller balloons on the rose stuffer attachment. |
 |
6. Squeeze the handles together so the prongs expand to their maximum. Lift the stretcher over and off the collar. The balloon is now loaded on the stuffing machine. |
This unique balloon stretcher is designed to stretch balloons from 6" through 18". It is especially useful in mounting the smaller balloons on the rose stuffer attachment.
NOTE: Printed balloons with lettering will have to be turned inside out before mounting on the balloon stretcher, or the lettering will not be legible.
Stuffing and After Stuffing
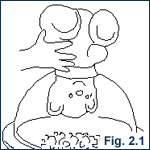
At this point you can stuff some shredded paper, a plush animal or any object that will fit into the 5" opening, into the balloon through the stuffing sleeve and the chamber collar. (See Figure 2.1) When you are finished stuffing, follow these steps.
Step 1
Remove the stuffing sleeve.
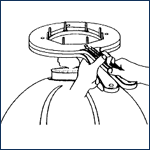
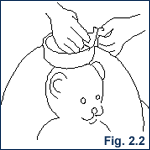
Step 2
Remove the balloon lip gently from the collar tabs, one by one. (See Figure 2.2) The balloon is still held by a vacuum against the chamber sides and will not deflate even when the balloon lip is totally free from the collar unless you push down on the side of the balloon inside the chamber, breaking the seal.
NOTE: Occasionally the balloon will lose air while you are stuffing, especially if you take more than a few minutes. If this happens, place the chamber back on the inflator motor and re-establish a fully inflated balloon before removing it from the chamber collar.
 |
 |
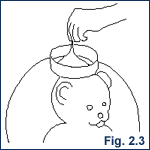
Step 3
Grasp the mouth of the balloon and twist it to close the balloon. If the stuffed balloon is not too heavy, this is easily done by lifting up the balloon and the chamber by the neck of the balloon and then spinning the chamber about ten times. (See Figure 2.3)
Step 4
Set down the chamber with the balloon neck twisted closed and apply a balloon clip to seal or secure the balloon.
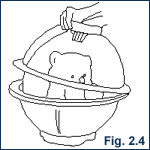
Step 5
Push down on the shoulder of the balloon, next to the inside of the collar, releasing air to break the vacuum seal and remove the chamber top at the same time. (See Figure 2.4)
 |
 |
 Step 6
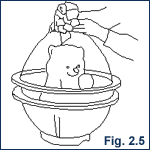
Set aside the chamber top or turn it over and nest it inside the chamber bottom. Replace the stuffed balloon inside the half chamber while you finish decorating the outside of the balloon with ribbons and bows, etc. (See Figure 2.5)
NOTE: The black base inside of the bottom chamber is velcroed in place and can be removed for cleaning out the air valve. Then replaced back in the same position.
Inflator Hose
The inflator hose attaches directly to the inflator motor on the end that blows air.
The inflator hose moves the air source to the balloon. Use it to inflate large balloons, for example when adding more air to a giant 40" paddle balloon (after it has been inflated in the chamber and stuffed). It can also be used when inflating small balloons, or a basketball, inside an 18" balloon in the chamber. (See Figure 2.7)
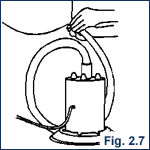 Step 1
Place inflator motor on the work surface with the screened port down.
Step 2
Place the inflator hose into the port on the top of the inflator motor.
Step 3
With the foot pedal, blow air into the balloon via the hose.
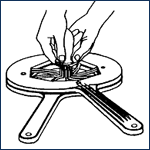
A set of stuffer tubes are available for conveniently stuffing flowers, bouquets and other smaller objects into smaller balloons. This section describes how to set up and use these tubes.
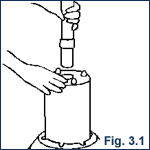
Rose Stuffer
Step 1
Set the inflator motor in the stabilizing tray screen end down and place on a hard floor.
Step 2
Insert the appropriate end of the Rose Stuffer tube into the port on the top of the inflator motor. (See Figure 3.1)
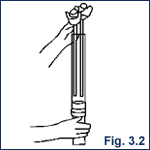
Step 3
Lift the outer tube and insert, for example, a floral vial containing two or three stemmed flowers. (See Figure 3.2) The outer tube should be raised high enough so that the top of the flowers are not above the top of the tube.
NOTE: Stagger the flowers at different heights so they do not become damaged inside the tube.
 |
 |
Step 4
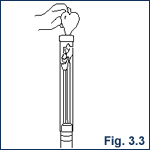
Stretch the mouth of an appropriate sized balloon over the rim of the upper tube while it is in the raised position. (See Figure 3.3)
NOTE: The size of the balloon used will depend on the size of the floral arrangement and the size of the vial. You may have to adjust the amount of balloon stretched down onto the tube depending on balloon, flowers and vial size.
Step 5
Holding the balloon on the tube, step on the foot pedal and gently inflate the balloon to the appropriate size.
CAUTION: These balloons can pop near your face if they are over-inflated. Be light on the foot pedal. (wear eye protection)
Step 6
Holding the balloon and tube, slide the outer tube down. As the clear tube is lowered, the floral arrangement in the tube will rise into the balloon.
Step 7
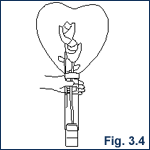
With the flowers inside the balloon and the neck of the balloon adjacent to the vial holding the flowers, roll the neck of balloon up and off of the stuffer tube and onto the surface of the vial all at one time by wrapping your hand around the stuffer tube and roll the balloon off all at one time. (See Figure 3.4)
NOTE: If needed, you can now remove a little air from the balloon by lifting the lip of the balloon away from the vial, allowing air to escape.
Step 8
The balloon should seal to the vial. For added security, you can use a rubber band to hold the balloon onto the vial or use a low temp glue gun (see Helpful Hints) and glue the balloon to the vial.
Step 9
Insert the vial into a vase if desired.
 |
 |
 Bud/Bouquet Stuffers (Optional Purchase)
The Bud Stuffer tube attaches onto the Rose Stuffer tube. It operates the same way as the Rose Stuffer and is suitable for stuffing smaller gifts (such as a single flower) and for smaller balloons. (See Figure 3.5)
Similarly, the Bouquet Stuffer tube attaches to the Rose Stuffer tube. It operates the same way and is suitable for stuffing larger gifts (such as a flower bouquet) and larger balloons.
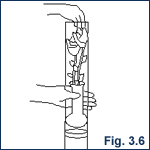
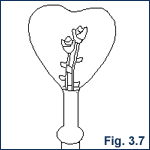
NOTE: A small vase with flowers can be placed right into the Bouquet Stuffer tube. The balloon is then sealed right on to the neck of the vase. (See Figures 3.6 and 3. 7)
 |
 |
Step 1
Remove the grey Rose Stuffer tube and repalce it with the Rose Bud or Bouquet tube assembly slide the Bud/Bouquet Stuffer tube down over the top end of the grey Rose Stuffer tube.
Step 2
Make sure the Bud/Bouquet tube freely up and down on the grey tube. You can add a spray silicon to the inside of the Bud/Bouquet to help lubricate it.
| The Rose Bud Stuffing System (Optional) Twist the grey tube back an forth at the angle shown until it slips into the clear tube |
 |
As with any new venture, a little practice with the Keepsake Stuffer will lead to greater familiarity and greater competence. The Keepsake Stuffer requires just a little Physical dexterity, strength, and training. Keep at it and stuffing balloons with the machine will quickly become second nature.
Latex is biodegradable. An inflated latex balloon will oxidize and become cloudy over time as it degrades. Sun rays, temperature and humidity all play a part in the oxidization process as does the specific brand of balloon you are using. To prolong the life and clarity of your latex balloons we recommend coating the balloon. A silicone compound, "Stay Clear", sprayed on and polished with a cotton glove will make a balloon shine better and stay clearer longer.
The wide mouth. 18", latex balloons that are available for purchase through Keepsake are the best balloons to use with the Keepsake Stuffer. These balloons have a wide, short neck. Other 18" balloons tend to have narrower and/or longer necks for easier hand tying; but this makes stuffing more difficult.
When using balloon clips, be sure to twist the neck of the balloon at least 10 times and put the twisted balloon all the way to the back of the clip.
Use a low temperature glue gun to glue small items to the inside or the outside of the balloon. This tool can add greatly to your stuffing and decorating portfolio.
To make an item stand up in a balloon, use monofilament (fishing) line. Monofilament will give the illusion that the object is suspended inside of the balloon. For plush animals, use a large sewing needle to thread the monofilament line through the top of the head of the animal, tie a knot and suspend the animal from the line. For a champagne bottle, simply tie the line around the neck of the bottle to make it stand up inside the balloon. Use a low temp glue gun and place two spots of glue on the bottom of the bottle. Glue the bottom of the bottle to the bottom of the balloon. Run the line out of the opening in the balloon. When stuffing is completed, adjust the line and the gift item and hold the line securely while twisting the neck of the balloon.
About the only sensitive part of the Keepsake Stuffer machine is the rubber seal around the chamber top. Get in the habit of handling the chamber top by the collar, not by the rim with the rubber seal. Also, when storing the chambers nest the bottom half inside the top half to further protect the seal.
KEEPSAKE STUFFER
Two Year Limited Warranty
Keepsake International., the manufacturer, warrants the Keepsake Stuffer as follows:
- For a period of two years from the date of the original purchase, we will repair or replace, at our option, the machine or any part thereof if it has failed to operate as the manufacturer intended as the result of defects in workmanship or materials.
- In order to obtain warranty service, the purchaser must first have an Owner's Registration on file, obtain warranty service Return Authorization and ship the defective machine to our designated service location (freight prepaid by sender) The machine will be returned to the purchaser freight prepaid.
- Unauthorized modification of any part of the machine or any use other than that which is intended by the manufacturer may invalidate this limited warranty coverage.
- Excluded from this limited warranty coverage are:
- Damage due to operator neglect or normal wear and tear.
- Damage caused by acts of God or nature or accidents.
- Damage caused in shipping or transport of the equipment.
- Damage to the inflator due to being dropped.
- Cosmetic damage after first use.
- Consequential damage.